
About
All Feedback (375)
- everdeals1 (31238)- Feedback left by buyer.Past monthVerified purchaseGreat communication. A pleasure to do business with.
- e-part2 (15826)- Feedback left by buyer.Past monthVerified purchaseGood buyer, prompt payment, valued customer, highly recommended.
- undergarage (23780)- Feedback left by buyer.Past 6 monthsVerified purchaseQuick response and fast payment. Perfect! THANKS!!
- l***0 (58)- Feedback left by buyer.More than a year agoVerified purchaseThe items were shipped quickly and were exactly as described and shown in the pictures
- d***a (271)- Feedback left by buyer.More than a year agoVerified purchaseGreat seller. Item as described
- i***1 (324)- Feedback left by buyer.More than a year agoVerified purchaseGreat Transaction and Super Fast Shipping!
Reviews (10)

29 May, 2018
An easy way to add wireless charging to your LG G3
This little sticker was easy to apply and made it possible to charge my LG G3 phone using a wireless charging station.
06 Mar, 2016
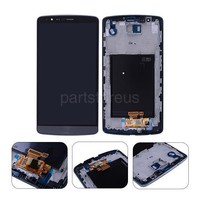
A smart looking, high quality and budget friendly replacement screen.
2 of 2 found this helpful Introduction
I bought this LCD Digitizer Frame Assembly to repair my LG G3 from Verizon, VS985, which had cracked glass and an unresponsive digitizer. I am pleased to say that the end result could not be better, although the process was a bit tricky. Watching videos on YouTube about how to disassemble the original broken phone was extremely helpful.
Packaging
This assembly came very well packaged. The screen itself had a film protecting the glass. Then the assembly was packaged inside a plastic sleeve. The frame was then wrapped inside two layers of bubble wrap envelope. This was then placed inside a foam carrier, which was then put inside a cardboard box. Needless to say, it arrived undamaged.
Disassembly of old phone
The main reason I ordered the entire frame assembly was because I didn't want to deal with separating broken glass from the LCD, using a heat gun, etc. Instead, the only tools I needed were a small Phillips screwdriver, a flat pry tool, and a few flat pieces of plastic. (I used a small, flat jeweler's screwdriver as a pry tool -- this is okay if you are very careful, but usually a plastic pry tool will be preferable.) Slightly long fingernails also come in handy, as does some patience if you are doing this repair for the first time, as I was.
Reassembly into new frame
It's a good idea to keep very good track of the parts of your phone that you disassemble so that you can put them into the new frame. I should note that in the new frame, there were small pieces of adhesive that were already precut and stuck in the new frame. Each small piece was protected from dust by a bit of blue plastic film with a tiny tab for easy removal. This made the job much, much easier. So it's really a matter of disassembly of components from the old phone, peeling off the blue plastic backer protecting the adhesive in the new frame, and putting the corresponding components in place. Pretty straightforward.
Issues
There were a couple of slight issues with the frame that I received. First, a small piece of tape on the new frame covered one of the screw holes, so I had to take a small knife and trim that back a bit to expose the hole. Really not a big deal. Second, the ribbons connecting the digitizer and the LCD to the motherboard were just a tiny bit to the side (like a small fraction of a millimeter), so the connecting ribbons had to flex ever so slightly in order to click on properly. But once they were on, it was all good.
The end result
The only obvious differences between this and the original screen are that there is no Verizon logo on the front (I don't care about that) and the bottom band, instead of the original black, is gray (which is the color that I ordered). There is an LG logo on the front in the gray band at the bottom.
Bottom line is that once I put everything back together, my previously broken phone powered up, just as good as new. The screen looks great, and the digitizer works flawlessly. Overall, the repair took about an hour as I was being very, very careful not to break anything. If I had to do it again, I think it would take half as long the next time. While I hope there isn't a next time anytime soon, if there is, I would definitely purchase this assembly again.
Good luck, and I hope this review was helpful!

21 Dec, 2019
An easy to install igniter that does its job!
2 of 2 found this helpful This is a gas oven igniter that I purchased to replace a failing igniter in a Maytag oven range. The build of this igniter as compared to the original seen pretty much identical, and it works like a charm once installed. Swapping out the old one for this new one is quite simple, which I will detail here.
First and most important step: UNPLUG the oven! After that, you simply remove all of the racks from the oven, then undo and remove the oven's floor (it may be screwed down), which gives you access to the gas burner assembly.. Typically these igniters are held on by two screws that hold the igniter close to the gas burner; you really can't miss it.
PRO TIP: It makes disassembly easier if you take off the oven door. It's quite easy to do on these models, simply open the door about 4 inches, and then pull straight up. The door will slide off of its hinges, no unbolting of screws needed.
Once you locate the old igniter, simply unbolt it and pull it away from the burner, pulling the wires a few inches out of the back wall of the oven. After that, just snip the wires off of the old igniter (cut close to the old igniter body) and then strip a little bit of insulation off of the old wires. You then use the included ceramic wire nuts to connect the ends of the wires from the new igniter to ends of the old igniter's wires. It doesn't matter which wires you connect, so long as you are connecting an old wire to a new wire within each wire nut.
After that, you tuck the excess wire out of the way behind the back wall of the oven, and then bolt the new igniter back onto the burner assembly. Then you put your oven back together by replacing the floor of the oven, the racks, and the door.. If you did everything correctly, after plugging the oven back in and turning on the oven, you should see the igniter start to glow and hear a flame come on in about 20 seconds.
I've purchased a few of these igniters and each time it's a straightforward repair that takes less than 15 minutes.