
About
All Feedback (1,030)
- security_trade (7623)- Feedback left by buyer.More than a year agoVerified purchaseGreat communication. A pleasure to do business with.
- perfektgarten (150329)- Feedback left by buyer.Past 6 monthsVerified purchaseGreat communication. A pleasure to do business with.
- homebeautyss6 (2746)- Feedback left by buyer.Past yearVerified purchaseThank you for an easy, pleasant transaction. Excellent buyer. A++++++.
- *****- Feedback left by buyer.Past yearVerified purchaseGood buyer, prompt payment, valued customer, highly recommended.
- *****- Feedback left by buyer.Past yearVerified purchaseMany thanks - brilliant customer - no issues!
- *****- Feedback left by buyer.Past yearVerified purchaseQuick response and fast payment. Perfect! THANKS!!
Reviews (5)

09 Feb, 2022
Usb to 9 pin Serial adapter (I used for UPS power supply)
I purchased this to connect to the communication port of my Uninterruptible Power Supply: this allows my system to shut down in a controlled manner if triggered.
I have another exactly the same which is used for my GPS receiver.
Just plug the USB cable in to a free port on Windows 10 PC, wait for a few seconds and the device will be detected as a Standard Serial Port. That’s about all you have to do…
If you’re into fiddling about you can also choose to go into Device Manager and change the Com Port Number (1, 2, 3, 4, 5, 6, 7…) and ten Baud rate. For GPS I set the Baud rate to 9600, but for the UPS 1200 is fine.
There was a driver disk supplied but I didn’t need it as the UART chip on this device is a standard device that Windows supports by default.
If you’re using Linux (Ubuntu, Fedora, Mint) this too will handle all the install for you. I tested the adapter out of interest on my Ubuntu machine and it worked without any problems at all.
It’s nicely built; the case seems strong and built to last; the cable is reasonably long too - I have a male / female 9 pin, 2m lead I used to extend the lead for UPS connection and that works fine.
All in all a nice job. I have two of these right now but will buy another three for another project.
Definitely recommended to anyone looking for an inexpensive, well built, reliable device that works well.
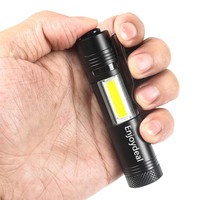
26 Apr, 2018
Light weight, small, bright & genuinely useful light source
I was so impressed with this little torch that I've since bought two more of them: one for my car and one for my wife's car.
The body is made from solid, die cast metal; it also acts as a heatsink for the LED. Its tough and durable enough to withstand being dropped a few times.
At about the size of a whiteboard marker, it's small enough to carry in a coat pocket or handbag without causing problems.
While the LED lightsource is super small, the light it gives out is easily bright enough to see by. I've used mine in the dead of night, in the English countryside (where there's no artificial light at all) and I could easily see what I was doing / where I was walking.
Modes: high beam; low beam; flood light and flashing. Pressing the on/off button at the end of the torch switches between modes sequentially:
If you are in high beam, then switch off, the next power on gives you low beam, do it again and you get flood (the rectangular COB on the side).
High beam - the brightest output. With a new battery the beam travels a good two meters before it diffuses to a point where you can't see. If you point it at your feet from chest height for example, you get a pool of light approx one meter in diameter.
Low beam is about 2/3 or maybe 3/4 the intensity of high beam; handy for working close up, where high beam can often dazzle; the battery lasts longer in this mode too.
Flood light - provided by the small rectangular LED on the torch body. At first I didn't see the point of this - It appears very similar to the high beam setting and it illustrates the same kind of area as high beam; it appeared to be a gimmick at first...
Once I'd used the torch in a real world situation however (looking for a box in a dark shed) I quickly discovered the purpose of it... If you need a to light an area from above, and you hang the torch on string, or place it side on, on a shelf for example, using high beam mode, all you get is a pool of light on the floor or the wall opposite. LED light log quite directional too, so if the shelf your torch is on is above you, there's a horizontal line beyond which the light barely travels, so while your opposite wall isnbriggtmy lit, your floor isn't.
Stand this torch on end however (so you have a tower: button at the top, reflector at the bottom) and turn on the flood light... Now you get a proper flood of light: floor to ceiling. It's very useful indeed if you're hunting on the floor.
For the price I rely don't know how they make these things such good quality. Honestly it's a superb little torch. It's not the brightest light in the world, but but takes a single AA cell and it's smaller than a whiteboard marker. It doesn't get hot, the battery lasts for HOURS and I didn't see the LED dim appreciably when it had been on for a few min which I've seen in 'better' (more expensive) torches.
In comparison to my 2 year old Duracell 'pen torch': cost £8; contains 2 AAA batteries; longer body; 100% plastic and only supports on or off only, inhabe to say that - this little metal bodied, high brightness torch is astonishing.
Buy a couple. They are great!

06 Nov, 2019
Buy a broken NES and learn something new...
I bought this faulty NES because I was interested to see just how difficult it might be to repair one. As it turns out, 80’s electronics really aren’t that difficult to fix.
In this case the cartridge slot was the issue: it had dry joints (the soldier connecting the cartridge slot to the main circuit board was old and had become cracked and inflexible with age and constant use. It seems that the constant action of inserting and removing game cartridges eventually breaks the solder joints and causes difficulties for the NES CPU when. Essentially the cartridges hold game data on a ROM chip; this data is passed to the NES CPU as required, and in order to do that, the 72 pin cartridge slot needs to have 72 fully operational connections: any breaks or bad contact on any of the 72 pins and the game either won’t work at all, or it will so strange things.
In this NES the seller very honestly advised of the fault and described what what’s happening in his advert. When I received the NES, because I already knew it was faulty, I’d already purchased a new cartridge slot, so in anticipation. All I needed to dont once it arrived was strip the NES apart, clean everything (may as well since it’s in bits anyway) and remove the faulty cartridge slot.
Taking the NES apart is easy, and a YouTube video or two was all I needed to understand exactly how to remove the old cartridge slot and attach the new one. As it turns out, because it was made in the 80s, before super tiny, surface mount components became standard, this soldering job was actually very easy. There’s a strong possibility that these NES machines were actually partly assembled by hand originally, as automation wasn’t as prevalent as it is now; certainly component placing on the board prior to a solder bath (to attach components) was common at this time.
Anyway, long story short, about 20 min of light soldering (removal and attaching the new slot) was all that was required. I also stripped and checked both controllers, replacing a couple of button contacts that looked worn and cleaning out years of grease and dirt. I also re-soldered some capacitors and other parts that a Google search recommended replacing.
The last thing I did was bleach the case back to its ‘brand new’ colour. This was a cheap and simple task that can be done with hydrogen peroxide: simply look up retrobrite on Google and you’ll find plenty of help for this part.
Once it was bleached and looking brand new again, it was reassembled and plugged in. I also fitted an RGB modification that I’d purchased as a kit so it would work more easily on my OLED TV, but this isn’t an essential step and if you’ve got a CRT TV is recommend using that instead as the games look so much better on a CRT screen - the latency of the image; the blur; the interlaced image format of a CRT... they all give these old games a certain look and feel that modern TVs just can’t manage. Also up scaling a 480i image (the resolution is actually under 300 lines for an NES) to 1440p or higher is bound to have consequences: imagine blowing up a photo from the side of a stamp to the size of billboard; how bad would that look? That’s pretty much what you’re doing when you plug a retro console into a 4K or 8k TV, and a lot of games relied on the strange method by which a CRT draws its image to create some beautiful effects and to give the illusion of special lighting effects or enhanced colours - modern OLED and LCD TVs don’t draw an image this way, and they are so sharp that many of these ‘effects’ and tricks are lost and don’t work on a flat panel modern TV. Light guns and old 3D glasses (like the Sega Master System has) don’t work either, so if you do have an old CRT TV, keep it and use it.
I’m really happy with my NES: it works beautifully. I also got a 200 in 1 games cart from eBay that has all the classic NES games on it, and it only cost £15.
If I hadn’t been able to fix it, or if it breaks again, I will a Raspberry Pi computer inside it, or maybe a Mini ITX PC and make it into a multi machine retro emulation machine. It’s easily done and the case looks so good now it’s been cleaned and retrobrited, it looks almost new.
It’s a very chic talking point, having a genuine 30 year old games console in your living room. Playing Super Mario with two players is even better!
As a project, it was a cheap way to learn a new skill and if I can find a retail box and instructions for it (for cheap) I can sell it at a profit, even after fixing it and cleaning it up.
I’d recommend buying a broken / faulty NES to anyone: if it’s totally dead just stick a mini PC in it, or use it a ms a biscuit tin!
The one tip I would give is this: don’t pay over £30 for a faulty NES if it has no retail box; if it’s got no controllers and no games or power unit (so if it’s just the NES) and it’s faulty, it’s literally worth £10 including postage.